Get Started with Blackboard: Faculty
Blackboard is EKU's learning management system (LMS):
- It provides a Web site for every EKU class and allows students and instructors to participate in class activities online.
- It offers online storage for course materials, discussion boards, virtual chat, online quizzes, grades, and more.
- It connects to textbook publishers' sites and other third-party tools.
Your login information matches what you use for EKU email.
We strongly recommend using Firefox or Chrome for Bb. (Edge, Internet Explorer, and Safari are not recommended because they are not 100% compatible.) On mobile devices, students can use the Blackboard app for many purposes, but we advise them to take tests and submit files only through true browsers. The Blackboard Instructor app provides limited functionality for managing Announcements and discussion forums, and grading for students’ files.
Get Help with Blackboard
- Call the IT Service Desk 1-859-622-3000 (Hours)
- Email the IT Service Desk support@eku.edu or Create a ticket
- IT Service Desk on X, Facebook, and Instagram: @EKUITColonels
- Please tell your students to call the IT Service Desk -- not you -- for help with Blackboard!
Course Basics
- Focus your attention on the COURSES page. Each of your courses has a "card" that links to the course site. Use the "star" icon at the right end of each card to mark your Favorites, which are displayed at the top of the column on the Courses page. A "lock" icon (and the word Private) on a card means that the site is currently not open to students, but you always have full access to your sites. The Courses page can be viewed in either list or "tiles" display.
- Your course sites are automatically populated with your students, ready for your use. This is populated from information in Banner from the Registrar's office.
- All course sites are UNAVAILABLE to students until YOU, the instructor, make them available. To make a course available go to your Course Management menu area: Customization > Properties > click “Yes” in section 3, and check that the Duration dates are current, then click Submit.
To post your syllabus:
- From your course menu, click Course Information > Build Content > Create “Item.”
- Type the “Name” for the item, then click “Browse my Computer” to locate your file. Click Submit. Use the handles at the left margin to drag and drop this item into the vertical position you prefer.
- You can also “paste” the contents of your document into the typing box on the editing page. Your text will appear as soon as students open the folder.
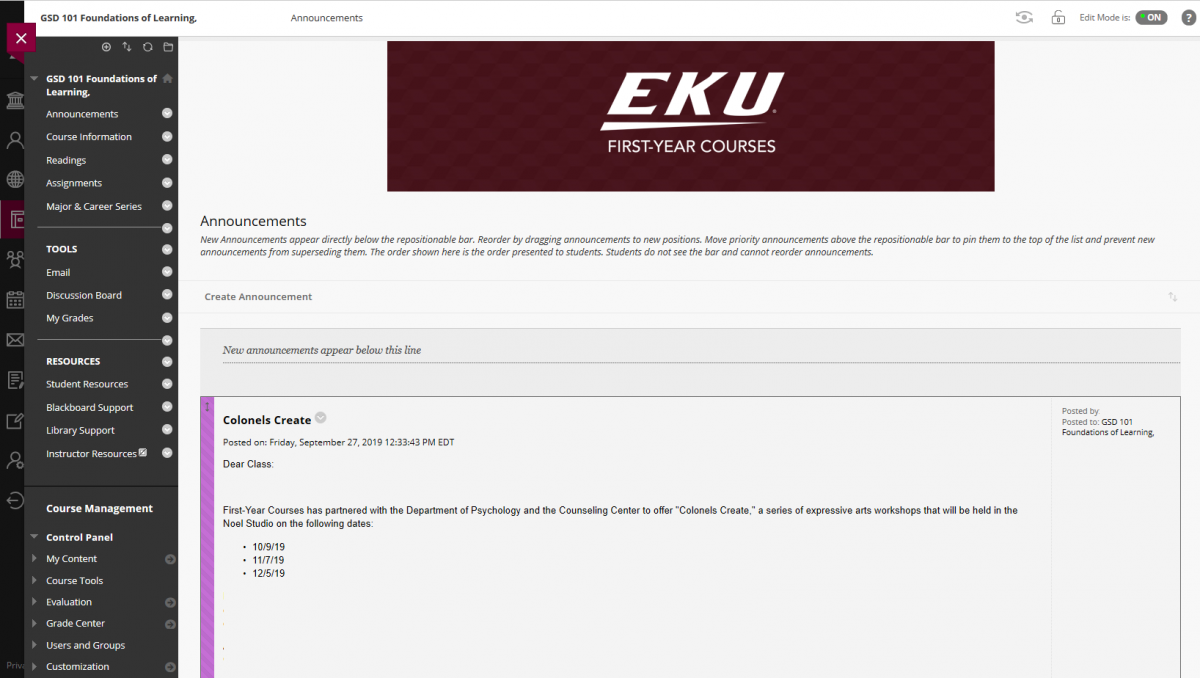
To post an Announcement:
- Click Create Announcement, fill in the boxes, and click Submit
- You control the order of Announcements by drag-and-drop from the left margin.
To post other kinds of files (handouts, PowerPoint files, study guides, etc.), and keep them well organized:
- Devise a good framework of folders and subfolders for easy storage and navigation. While you could nest folders endlessly, good practice limits nesting to three levels.
- Open the Course Documents area (or any content area).
- Click Build Content > Content Folder (under “New Page”), type the Name for the folder, and click Submit.
- Click into your folder, then click Build Content > Create Item to upload your file. (“Item” gives you space to describe the contents. “File” provides merely a link to your file.)
On the course menu, you can modify the order of the items, using the left-margin vertical arrows to drag and drop the order you prefer. Use the “plus sign” at the top to add new menu items. Use the down arrow at the right end of each item to rename or delete it.
To send an email:
- Click Tools > Send Email. Or, click Grade Center > Full Grade Center, and use the checkboxes and the “Email” button above all the names.
- When you send an email from the Grade Center, you have an option to get the recipients listed on YOUR copy of the message. NOTE: Email messages are not saved in the Blackboard system.
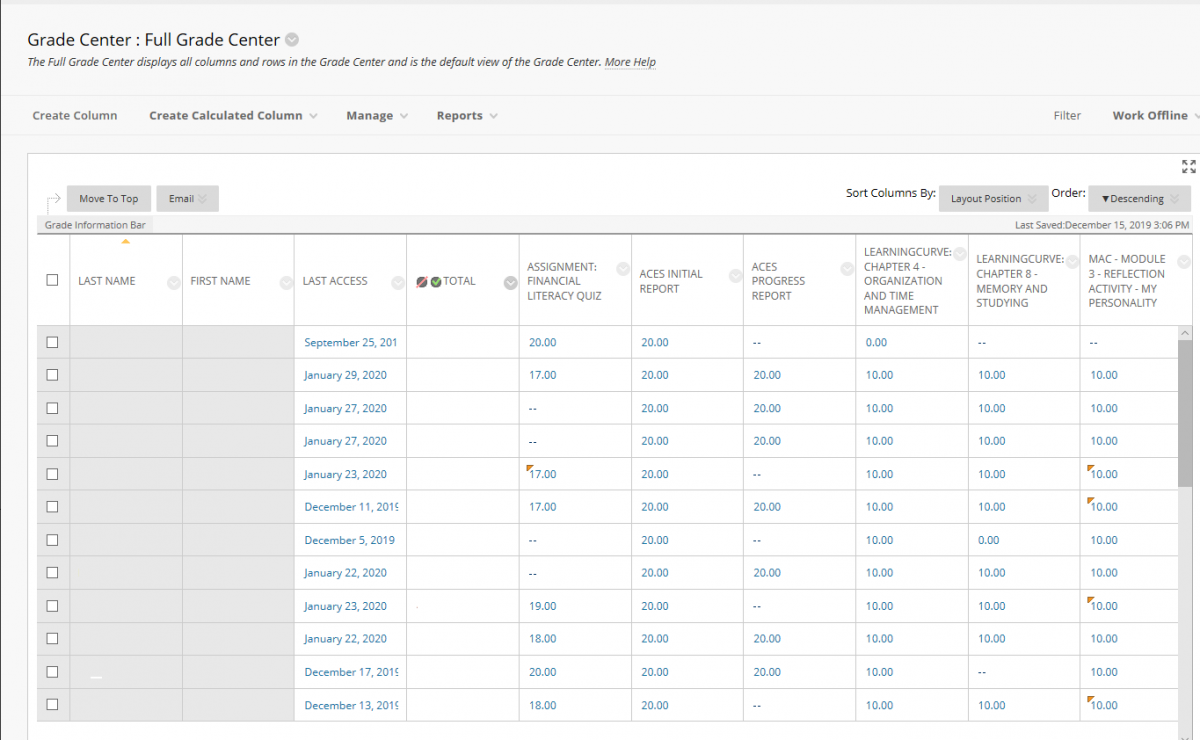
To post grades (manually) for your students, click Grade Center > Full Grade Center > Create Column.
- Type a “Name” for the column, set the Points Possible, and click Submit.
- Click the first student’s box, type the score, and press Enter. This moves the entry point to the next student.
- Note that the Grade Center row with your name is your own pretend-student account.
To create a link for students to submit files to you, for grading:
- Inside any content area, such as Assignments, click Assessments > Assignment. Type a “Name” and the Points Possible, and click Submit. This creates a link for the students and a Grade Center column for you.
- The Safe Assignment option, selected from Submission Details, scans the texts for possible plagiarism.
- In the Grade Center, yellow exclamation points indicate student submissions. Students' files open for grading in a frame where you may post comments, etc. You must post a numeric score to complete the process.
- The “Needs Grading” page (linked under Grade Center) tracks what students have submitted.
When you open a student's paper for grading, your display shows the "Blackboard Annotate" online grading page. This offers tools to highlight and comment on the student's work, use a rubric for scoring, and supply feedback through text, audio, and video.
We have made it easy for you to see your classes from the student’s view, by giving you a “pretend-student” account (or student view), which is automatically enrolled in each of your courses (and is included in the Grade Center).
- This username has a zero prefixed to your ordinary account, like 0smithj, and the password is the last four digits of your Social Security number. Use the "Other Blackboard Users" link on the login page to log into that account.
- This account is especially useful to practice submitting files, taking tests, and viewing grades. Blackboard also provides "Student Preview" for checking visibility of assignment links, Announcements, etc.
For live online (synchronous) meetings, EKU offers Collaborate (built into Blackboard), Zoom, and Teams.
- Collaborate works from inside your course, and is easily opened from the Tools page or by adding links to the course menu or any content area.
- For information about using Zoom at EKU, see the E-Presence page.
- For information about using Teams at EKU, see the IT Teams page.
Blackboard Video Demonstrations - Follow the links associated with the "Original Course View." The alternative "Ultra Course View" is in very limited use at EKU.
Sample Course Page in Blackboard
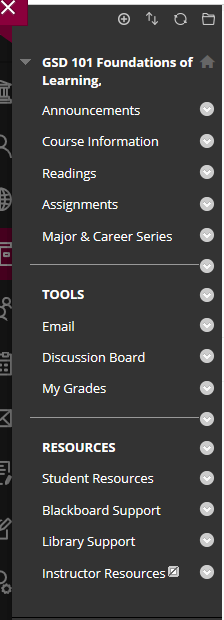
Course Menu
- Announcements
- Content areas such as Course Documents, Assignments, Modules, etc.
- Links to Tools such as Discussion Boards, Email, text chat
Use your Content Areas to manage…
• Course documents & folders
• Different kinds of documents
• Access to tests and assignments
Grade Center
- Create columns for students’ scores
- Access students’ files and tests
- Employ various options to deal with grades