myEKU
myEKU Documentation Menu
- General Navigation
- General Navigation Action Items Tutorial
- HR Leave Reporting
- HR Web Time Entry
How to Register for Classes in myEKU (PDF)
- Register for Classes in myEKU (Video)
- Web-4-Parent Service (PDF)
MyEKU General Navigation
Welcome to the new MyEKU portal--the new platform replacing EKUDirect. MyEKU aggregates content from multiple EKU systems and displays the data in ‘Cards’ on the user’s Dashboard. In addition to cards, the user’s Dashboard displays announcements created by EKU and notifications targeted to specific users--links to social media, a calendar, or surveys.
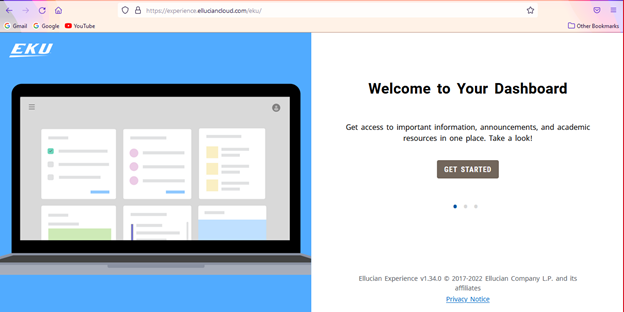
- When logging in for the first time, you will see the following Welcome screens:

- Click on the GET STARTED to bring you to the next information screen:

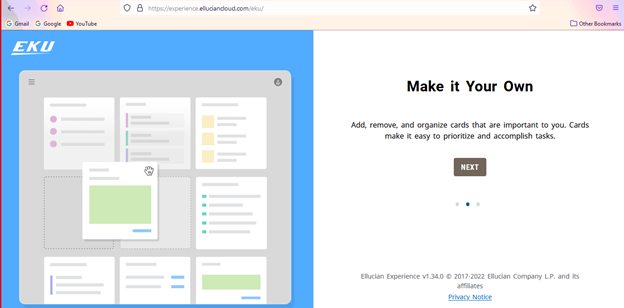
- Click on NEXT, and on this screen, you can choose NO THANKS or ACCEPT. If you click to ACCEPT and you decide later you do not want to share data, you can change this setting by going to your initials at the top right of the screen and changing those:

- Once you complete the previous Welcome screens, you will see the main page or MyEKU Dashboard. On this main page, you will see Announcements, if there are any, and Cards below the banner picture. NOTE: Your screen may look a little different than the examples pictures:

- Cards provide a concise snapshot of information. Each user can access Cards that are available for which the user has a role assigned to the Card. You can save or remove Cards on this Dashboard also. To add a Card, you will click the three (3) lines to the left of EKU in the banner section:

6. Click on Discover:

7. You will see a list of available Cards. To choose one to add or save, click on the little ribbon at the top right of the card to highlight it. It will fill the ribbon. If you see a card that is already filled in, that Card is already on your Dashboard. You can remove any by clicking on the ribbon that is filled in:

8. You can also search for cards by clicking on the Search line or by clicking on one of the available tabs, as shown in the screenshot above. .
9. Once you have your cards, you can also move them around and reorder them on your main screen. Go back to your main screen by clicking on the EKU in the top left of the screen. To reorder the cards, you can click and drag them to a different location or click on the three (3) ellipses and click on Move Forward. This choice will move the Card to the right.

10. In the example below, the Advancement Officers Card was moved to the right of the EKU Sports minute card.

11. To remove a card that you do not want, click on the ribbon in the top right of the Card to unhighlight it, and it will be removed. You will get a confirmation that it was removed, or you can UNDO if it was an error:

12. Some Announcements will show at the top of your Dashboard. This is by the institution and could be a reminder to do a task or a survey. The example below reminds me to register for my parking permit for 2022:

13. Some cards have quick links of interest or web links:

14. Click on the desired link, and it goes to that webpage on a new tab in the web browser. To return to the menu page, click on the tab in the browser that has the Home-myE3 Portal:

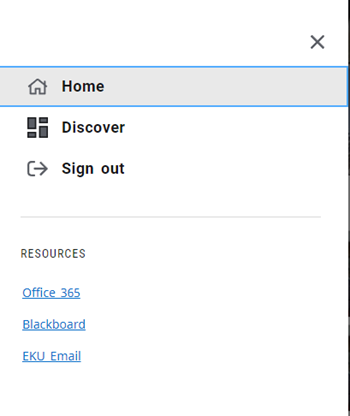
15. There are also RESOURCES under the Main Menu with links when clicking on the three (3) lines on the left of the screen:


16. On the top right of the dashboard page, you have a picture icon with your initials. This icon will take you to your Personal Profile menu page:

17. To return to the Dashboard, click on the EKU icon on this Personal menu page.
18. The little bell to the left of your initial is the Notification icon. This bell icon alerts you if there are any notifications or any new cards that are available. It will have a red dot on it:
19. Users can add the link to their smartphone homepage for quick access.
- On an iPhone, navigate to the link in the phone’s browser.
- From the website, tap
 , then tap Add to Home Screen.
 - The icon appears only on the device where it was added.
MyEKU General Navigation Action Items Tutorial
- When logging into a specific Self-Service application, you may get the following message, some action item(s) are required, and some are voluntary:

- Action Items that are required and will be marked with
 and will tell you what process is halting; otherwise the action is voluntary:
- Click in the Registration Agreement box as seen below marked by the arrow:
- Click the I agree to button and click the Save button if you agree to the terms: