Pronoun selections and name pronunciations are coming to Blackboard
What’s new
EKU’s Blackboard users now have the opportunity to display pronouns and name pronunciations as part of their diversity and inclusion improvements!
How it works
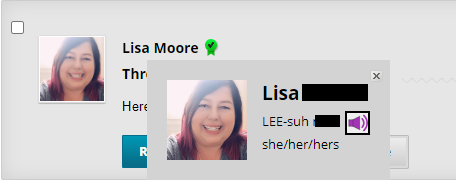
In many areas inside Blackboard, including discussion boards and class rosters, each person’s name is displayed with an icon (or avatar), and when that icon is clicked, an extra box shows the user’s name with any pronunciation and pronouns that have been supplied.
For example, in a discussion board message, clicking the users avatar open's a box with extra information. If the user has included a pronunciation guide, recorded the pronunciation, and included their pronouns, you will see those:
How to set things up
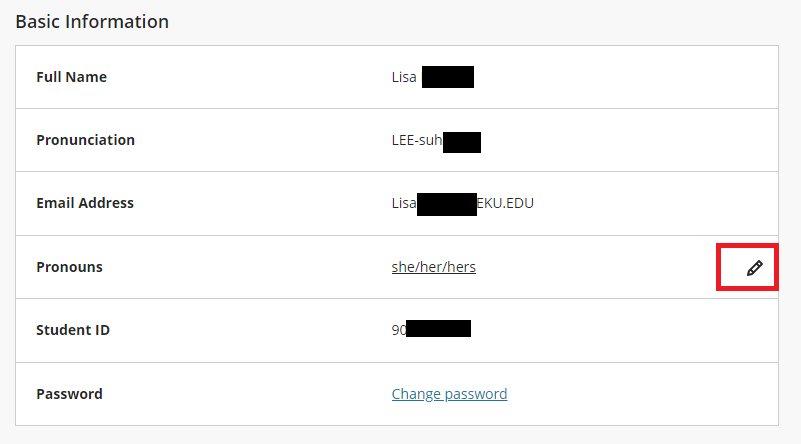
- Log into Blackboard and click your name on the left-hand menu
- Under the Basic Information section, you can click the link to Add pronunciation and Add Pronouns (you can choose as many as you want)
- Under the Additional Information you can click to Add gender and Add other name/nickname
- Clicking any of those links will pull up the Basic Information box on the right
Pronouns
We provide the following options for displaying pronouns in Blackboard:

Most of those choices also exist in myEKU, and if you have set your pronouns there, they may already be set for you in Blackboard.
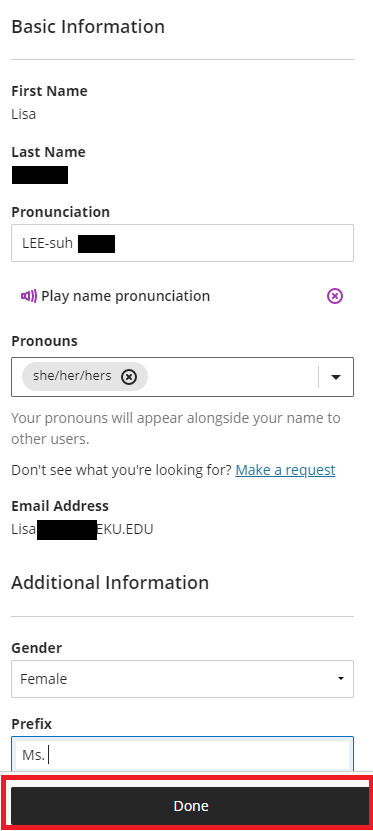
To reach the Pronouns setting in Blackboard, click your name on the main navigation menu, to open your Profile page. In the Basic Information section, look for the line named Pronouns, and click Add Pronouns. This opens a box named Contact Information, with a section inviting you to “Select your pronouns.” After you make your selection, click the word “Done” at the bottom of the box.
Pronunciation – text
To help others say your name, go to the Contact Information box (by clicking your name on the main navigation menu, and then click “Add pronunciation”), and type into the “Pronunciation” box. To spell your name phonetically, break the parts of your names into syllables, capitalizing the letter sounds that one might emphasize when pronouncing your name. Include all letter sounds that might help a person say your name, even if those same sounds are not present in the actual spelling of your name.
Put hyphens between the syllables. You can use Google to search for phonetic spelling YOUR NAME Or you can get more guidance at https://www.cmu.edu/hub/registrar/docs/phonetic-spelling-instructions.pdf. For example, Evelyn Kleppinger might type out EH-vuh-len KLEH-ping-er.
Pronunciation – recording
NOTE: This feature does not work in Safari because of file format mismatch support!
- To record your name so that others can hear it, click Record name pronunciation.
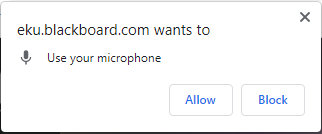
- A purple box tells you you may record up to 20 seconds, and then count down to the recording start. NOTE: You may need to give Blackboard your permission to use your microphone.


- When you are finished, click the Play name pronunciation, and then you can play your recording for yourself.

- To record again, click the small “x” icon at the far right. When you are satisfied, be sure to click Done at the bottom of the box.
Note: When you look at your Contact Information box, you will see many additional items. Please be aware that anything beyond the “Basic Information” area is visible only to EKU instructors, never to other students.
Updating Fields
If you need to change this information at anytime, hover over the end of that field and click the pen icon: